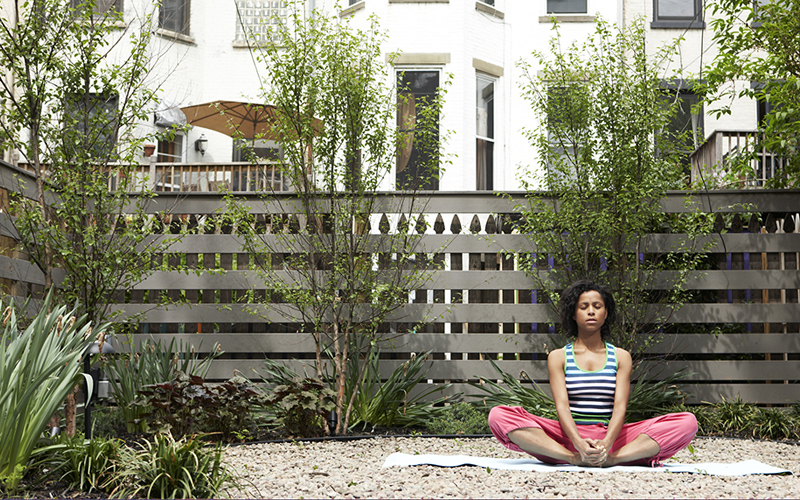
by guest blogger Holly Walck Kostura, BSN and certified Iyengar Yoga teacher
In my many years of teaching yoga, I’ve watched seasonal patterns emerge in my students’ bodies: fall’s sad farewell to summer exhibited by collapsed chests and downcast eyes; winter’s dullness that creeps into bones and muscles, creating joint pains of often unknown origin; and, every spring and summer, the “tricky low back” that resurfaces after hours spent bent over flower pots and vegetable beds (with the errant “football knee” or “tennis elbow” flare-up to sweeten the deal).
Fortunately there are yoga postures that stretch the arms, legs, and spine and put muscles that have been revolting back into a state of deep rest.
The following sequence is one of my favorites and is apropos for gardeners as well as all outdoor activity enthusiasts. It’s the perfect practice to enjoy during the sizzling’ summer season.
Yoga for the Gardner
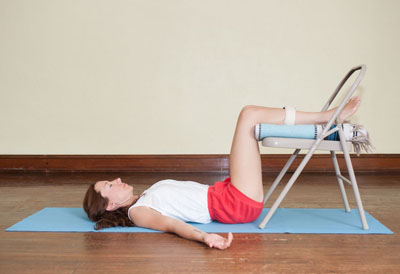
1. Deep Rest for the Lower Back (Low-Back Savasana)
- Lie on your back with your knees bent and your calves resting on the back of a chair seat. See that your thighs are close to perpendicular to the floor so that the sides of your waist release down toward the floor (you may need to place a blanket or pillow underneath your lower legs so that this happens).
- Stay here for a five to 10 minutes breathing normally. To come out of the pose, bend your knees into your chest, turn over onto your side, and come up slowly, bringing your head up last.
Benefits: This pose releases the entire spine and removes the load placed on the muscles of the legs, hips, and lower back.
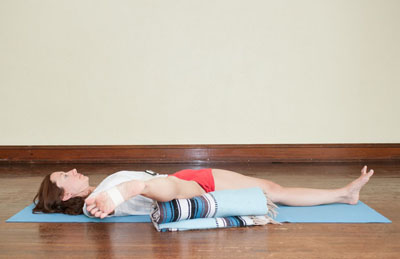
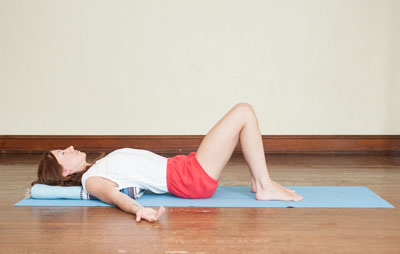
2. Vertical and Horizontal Supine Chest Openers
Vertical:
- Take two blankets and roll them together to create a long but narrow bolster. Sit on the bolster with your knees bent and lie back evenly, bringing your spine down incrementally onto the support. Rest your arms by your sides and lie here for a few minutes, breathing normally. Once you feel your arms relax away from your shoulders, raise your arms up a few more inches along the floor until you feel the muscles in your chest wall begin to spread open sideways like the horizon.
- To come up from the pose, turn over carefully onto your other side and lift yourself up, keeping your legs tucked in neatly (no kicking…it’s cheating!).
Benefits: This pose is a panacea for busy arms, bringing them into a state of stillness, silencing them deeply.
Horizontal:
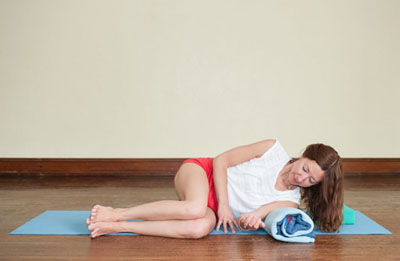
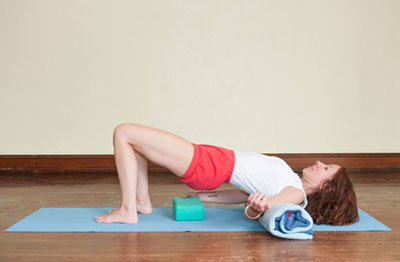
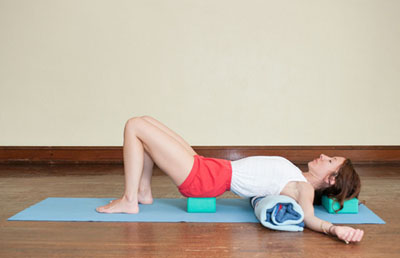
- Turn the bolster horizontally, bend your knees, and lie down on your side. Bring the top of your outer upper arm onto the bolster. While exhaling raise your buttocks, hips, thighs, and shins off the floor and roll onto your upper back. Place the soles of your feet on the floor and lift the bottom of your shoulder blades up and away from the floor while bringing your other outer upper arm down onto the bolster.
- Place a block under your pelvis so your buttocks aren’t collapsing down toward the floor and another block under your head so your chin isn’t lifting up. If you don’t have yoga blocks, use a shoebox or a phone book. (Get inventive with items you have around the house.)
- Take your arms out to the sides in line with your shoulders now, higher than you did in the vertical version of this pose. Lie here for a few minutes, making your inhalations and exhalations longer than you did in the previous level of the pose.
- To come up, allow your breathing to return to normal, turn over carefully onto your other side, and lift yourself up, keeping your knees bent.
Benefits: This pose opens the chest and armpits and moves the spine back into the body.
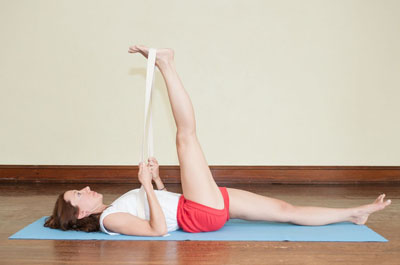
3. Reclining Leg Stretch (Supta Padangusthasana, Stage I)
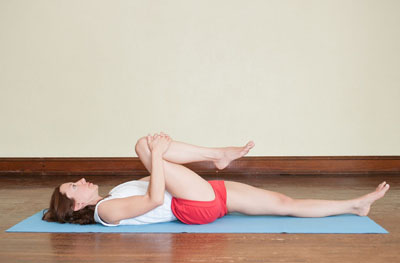
- Lie down evenly on your back with bent knees and then extend your legs. Bring your right knee and thigh up toward your chest and hold your right leg as close as possible to the right side of your abdomen while keeping the entire back of your left leg down on the floor. (If your left leg shortens here, bend your left knee and put your left foot on the floor for the rest of the pose.)
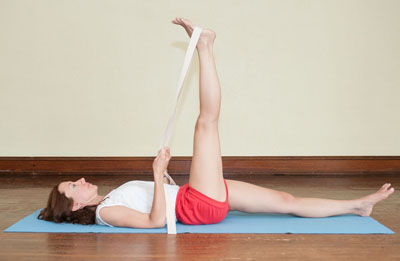
- Place a belt around the sole of your right foot, just below the balls of the toes and, while keeping the backs of your upper arms down on the floor, stretch your right leg straight up toward the ceiling. (If your right knee bends when you attempt this pose, bend your left knee and see if you can bring your right leg up to perpendicular. If your right leg still isn’t able to come to perpendicular, even with your left leg bent, then go back to the previous stage of the pose.)
- If possible, over the next few minutes, bring your right leg closer to your trunk while pulling your outer right hip down toward the floor and away from your right shoulder. Keep your right leg fully extended and your shoulders relaxed.
- To come out of the pose, reverse the directions until your knees are both bent. Then do the stretch on your left side.
Benefits: This pose stretches the hamstrings of the lifted leg and lengthens the inner and outer knee. It increases circulation in the hips, abdomen, and pelvis.
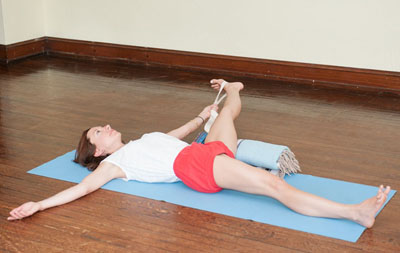
4. Reclining Leg Stretch 2 (Supta Padangusthasana, Stage II)
- From Stage I, above, while keeping the left side of your lower back down on the floor, lower your right leg to the side. Place a blanket under your right outer upper thigh (not your buttock) to help you keep your left side down on the floor.
- Keep the entire front of your body facing the ceiling, without rolling onto your right side. Turn your waist, abdomen, and chest to the left and stretch through your left arm to help encourage this alignment.
- After a couple of minutes, press the left side of your waist down to the floor and raise your right leg back up, then lower it down in stages.
- Repeat on the left side. To come up, turn over onto your other side and raise your trunk back up, head last.
Benefits: This pose loosens the hips and groins and opens the pelvis and abdomen.
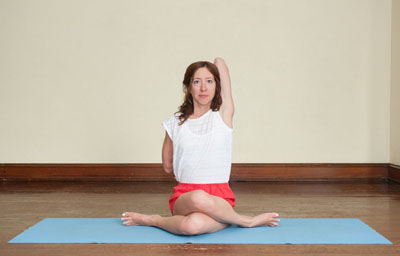
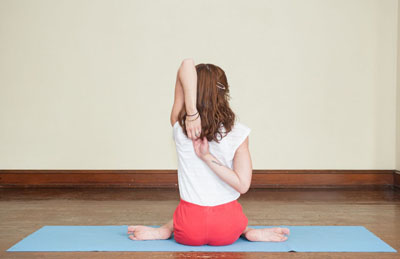
5. Cow Face Pose (Gomukhasana)
- Sit on the floor with your legs stretched out in front of you. (This sitting pose is called Dandasana, or Staff Pose.) Bend your knees and drop them out to the sides so that your kneecaps are now facing the walls on either side of you.
- Now take your left leg and bring it to the right until your left kneecap is facing forward in the same direction as your chest. Place your right thigh on top of your left thigh until your knees are stacked on top of one another and facing the same direction. The outer edges of your feet will be on the floor with the soles of your feet facing the wall behind you. (Sit on a block to encourage your legs to cross more deeply.)
- Bring your right arm around behind you, taking your hand up between your shoulder blades. Stretch your left arm up overhead in line with your ear and then bend your left elbow, keeping it pointing up towards the ceiling. Clasp your two hands behind your chest and lift your back ribs up and away from the clasp of your hands. (Use a belt if your hands don’t quite reach one another.)
- To come out, unclasp your hands, uncross your legs, and stretch them back out in front of you. Repeat the pose on the other side and then come back into Dandasana.
Benefits: This pose spreads the muscles that narrow the space between the femurs and the buttock bones and pulls the two buttocks away from one another. It opens the chest and moves the kidneys back into place.
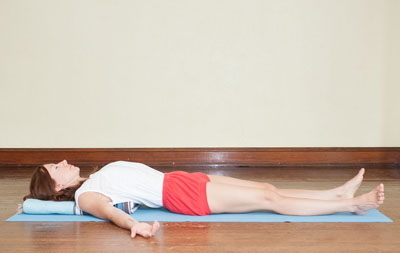
6. Corpse Pose (Savasana)
- From Dandasana (sitting on the floor with your legs stretched out in front of you), bend your knees and lie down onto the support of a folded blanket under your back ribs and head. This will encourage your back ribs to move up towards the ceiling and your chest to open from the inside out.
- Slowly, keeping the tops of your thighs pressing down towards the floor, stretch your legs out one by one and let your legs relax deeply from their sockets.
- Stay lying here for five to 10 minutes, breathing normally and keeping your mind connected to the soft, rhythmic flow of your breath. Be grateful for your precious body and for the food and/or flowers you planted, the grass you trimmed, or the weeds you pulled. Connect to the beauty of the world around you and THE ONE within you.
- If your back is sore, and the first pose was helpful, put your calves back on the chair seat.
- Come out by turning over onto your side and lifting yourself up quietly, slowly, and carefully so that your mind stays quiet for as long as possible. Join your palms together in Prayer Pose (Namaskar) and sit until you feel ready to open your eyes and make the journey back out into the world.
 Holly Walck Kostura uses the healing practices of Ayurveda and Iyengar Yoga to secure her to the core of her being. Combining her bachelor’s degree in nursing with her certification in Iyengar Yoga gives her the ability to approach her students from a place of wholeness and infuse her yoga classes with a unique flavor. Find her online at yogawithholly.com.
Sequence photos by Jessica Cuttic.




No comments yet.