by guest blogger Jean Nick, author and sustainability expert
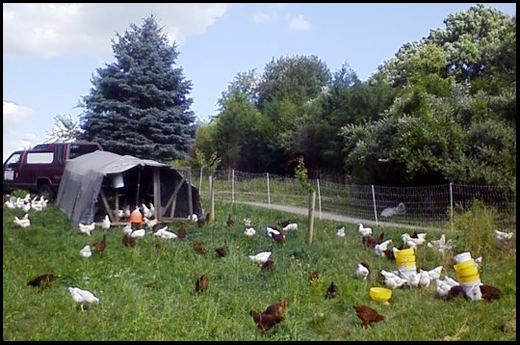
If you bought chicks in the spring they are about half grown by now, and they’re big enough and well feathered enough to spend their days in a run and their nights outside in a secure building or pen. They should still be eating chick starter and should continue to until they are 16 weeks old (for hybrid egg producers such as Red Stars) or 22 weeks old (for heritage breeds). Laying mash/pelleted food provides less protein, which may slow development in growing birds, and more calcium, which can permanently damage young kidneys, than chick starter/grower food. Your chicks should also be snarfing down bits of grass, leaves, seeds, bugs, and just about anything else that that is smaller and slower moving than they are.
Feel free to supplement the birds’ diet with fresh tasty weeds and just about any food or food trimming that would usually have gone to the compost pile (anything moldy should continue to go to the compost pile, of course), plus cooked meat and fish—raw could be a source of Salmonella. For a happy period I got the leftovers from a salad bar for my hens, and, as a flock, their favorites in order of preference were fish, meat, and dairy products, then pasta (hens and spaghetti are an amusing combination) and baked goods, and last, fruits and soft veggies. Greens move up the list in the winter, but are ignored when the hens have access to green pasture. There very few things, if any, that humans can eat that will cause chickens problems—at least in small amounts.
1. Know when to start them on big-girl food
Once you start feeding “layer food,” you can offer equal amounts of whole grain or cracked corn (a blend of those is called “scratch feed” and is great for scattering around—with a loud “here, chick, chick, chick”—when you want the girls to come running and go into their house). Obviously, organic is best. My next choice is a freshly ground “mash”-type feed (buy only about two weeks’ worth at a time or store the extra in the freezer so it stays fresh and nutritious). My last choice is commercial pellets, as they are more processed and are exposed to high heat and pressure. A hen will eat about a quarter of a pound of layer feed a day—less if you have lots of high-protein scraps to feed them, but you should still give them some layer feed, even so, because it contains minerals and other supplements to give them a complete diet.
2. Let them eat…egg shells
In addition to layer feed (if the feed doesn’t have it mixed in), your girls should have access to a small dish of oyster shell or crushed eggshells (on-demand calcium for strong egg shells) and another of “grit” (small bits of hard gravel that help grind up food in the gizzard). You can construct a simple feeder for shells or grit by cutting a hole in the side of a plastic bottle, poking a few small drain holes in the bottom, and tying the bottle to the side of the enclosure.
3. Be patient—The eggs will come
Now your almost-hens are eating you out of house and home and you’re wondering when, oh, when will they start LAYING? That depends on what kind they are, what time of year it is, and various other mysterious forces, but in general red or white hybrid layers may pop out their first practice egg (it’s likely to be a mini version) between 18 and 20 weeks after hatching; heritage breeds may be between 24 and 26 weeks. After a few small practice runs, the eggs will size up and each young lady will lay one just about every day.
4. Prepare nest boxes for eggs and perches sleeping
Provide a nest box a week or two before you expect the first egg. Nest boxes are for laying eggs in, NOT for sleeping. Hens prefer to sleep on elevated perches and if they sleep perching on the edge of the nest box, they will poop into the nest and onto your eggs. Yuck! So, provide an attractive perch (a 2″ x 2″ piece of lumber with the edges rounded, or a rough branch about 1½ ” in diameter is perfect) that isn’t over anything but floor—it will save you time and aggravation. Allow 9″ to 12″ of perch per hen and mount it in notches so you can lift it out if you need to. Spreading sheets of newspaper under the perch and changing them every morning or so (toss them into the compost) will take care of the vast majority of the cleaning.
A standard nest box is about 15″ x 12″ and 15″ high, with one wall only about 4″ inches high (to keep bedding and eggs from getting kicked out) and open above that. Ideally, the bottom should be removable for easy cleaning. One nest box is enough for 5 to 10 hens (if you have more, they will all decide one is better than the others, anyway). A covered cat litter box makes an instant covered nest box. Place the nest box where you can access it without going into the pen with the hens, such as up against a wall with an access hatch you can reach through.
5. Collect eggs daily
Collect eggs at least once a day. Wash them under running water that is slightly warmer than the eggs are (so the eggs won’t contract and pull wash water into the pores in their shells). Store them on the counter for a week or so or in the fridge for up to six weeks.
6. Tailor their care for summer
Hens need shade, breezes, and cool water to make it through hot weather. Attach a tarp to the top of your pen to provide shade at all times as needed, and open up all the vents in any enclosed areas so the air can blow through freely and the inside stays cool. Keep their water in the shade and refill it with fresh cold water in the morning and evening (and at lunchtime, if you can, on really hot days). Hens won’t come out of the shade and into the hot sun to drink and are less than enthusiastic about warm water in warm weather. You can also set up a mister to spray on the roof/shade tarp (but not on the hens—see below) during the day to take advantage of the cooling effect of evaporation during extreme heat.
7. Allow them bathe in dust
Hens don’t like getting wet (remember the phrase “mad as a wet hen”), but they do like taking dust baths. If you let your girls range, they will dig depressions in soft, dry soil (probably not right where you’d rather they did) and wallow, flop, and scratch until they almost disappear as they work the dust under all their feathers and down to the skin. Might not sound nice to you, but it is the height of hen pleasure and helps keep parasites away, too. Treat your girls to a large pan of dry soil (mixing in a cup or two of DE, or diatomaceous earth, gives it extra parasite-fighting power) if they don’t have access to loose soil on their own. (This is another great use for a covered cat litter pan.)
And remember to take time to sit down in the shade with a cool drink and watch and listen to your hens now and then, especially after tossing them a few treats. Instant stress (and sometimes comic) relief!
 Jean Nick, has been writing about gardening and sustainable living for decades. She has worked at Rodale since 1991, and started reading Organic Gardening magazine in 1972. In her spare time, she gardens, helps manage a sustainable farm, listens to audio books, makes all manner of useful and tasty things, and comments on eco-logical and eco-nomical topics as Rodale.com‘s Nickel Pincher.


By the way, there is no need to wash eggs unless they are visibly dirty (in some state’s it is even illegal to do so and any soiling must be removed with sandpaper rather than water, though other states require it). Many people feel eggs keep better if you leave their natural bloom on them by not washing them. If they are soiled, however, they will keep better if you clean them before putting them in the ‘fridge.
Great article! I just wanted to add that an invisible coating seals the pores of the egg shell right before it leaves the chicken. Once you wash that coating off, the pores are open and bacteria can enter the egg…. so it is important that once washed, they be refrigerated. Also… NEVER leave them to soak for hours in water as that makes it even easier for the bacteria to enter the egg. You are correct in that keeping laying boxes clean is more than half the battle, though! Enjoy your girls!
An impressive share! I have just forwarded this onto a coworker
who had been doing a little homework on this. And he actually
ordered me breakfast because I discovered it for him.
.. lol. So allow me to reword this…. Thanks for the meal!
! But yeah, thanks for spending some time to discuss this subject here on your website.
I don’t even know how I finished up right here, however I thought this post was once great. I don’t know who you’re however definitely you are going to a famous blogger for those who aren’t already.
Cheers!
Do you have a spam problem on this blog; I also am a blogger,
and I was curious about your situation; many of us have developed some nice procedures and we
are looking to exchange solutions with others, be sure
to shoot me an e-mail if interested.
Howdy! This post couldn’t be written any better! Reading through this post reminds me of my good old room mate! He always kept talking about this. I will forward this post to him. Pretty sure he will have a good read. Thanks for sharing!
Wonderful blog! I found it while surfing around on
Yahoo News. Do you have any tips on how to get listed in Yahoo News?
I’ve been trying for a while but I never seem to get there! Thanks
I go to see daily some sites and websites to read content, except this blog gives feature
based writing.